40-Spring Bean

spring Bean

  1. 本文简单记录了关于Spring中的Bean的实现和使用的部分理解
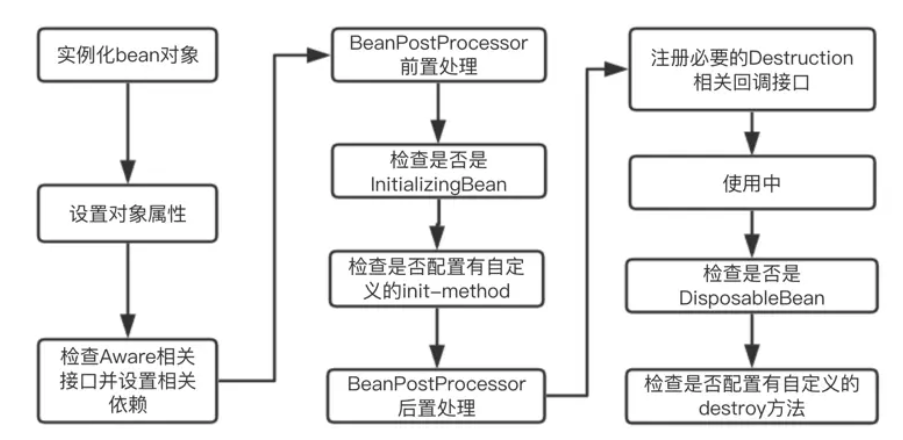
1. Spring Bean的简单流程

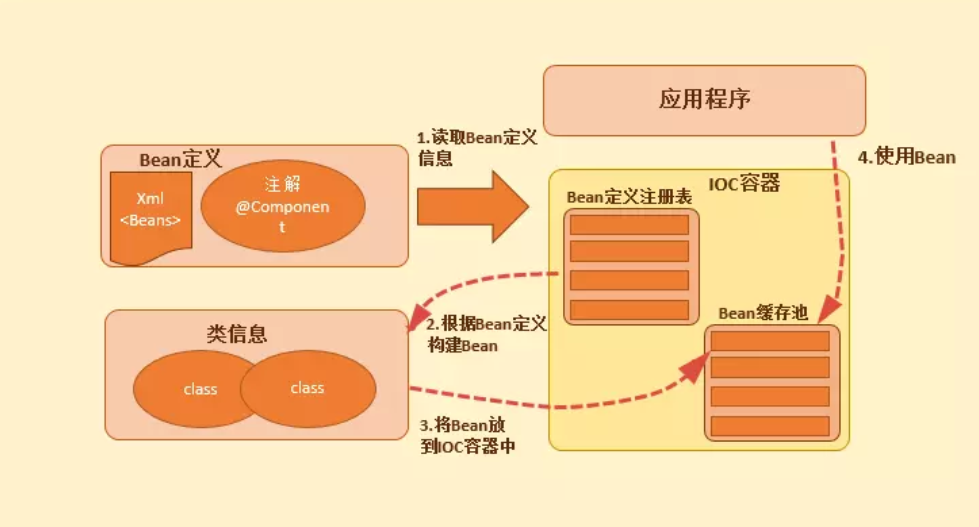
  1. 实例化【IOC容器寻找Bean的定义信息并将其实例化】
  2. 设置bean的Aware 【Aware意指能提前感知的,是spring的一个重要接口,使用依赖注入,spring按照Bean定义信息配置Bean的所有属性】
  3. BeanPostProcessor.postProcessBeforeInitialization(Object bean, String beanName)【如果BeanPostProcessor和Bean关联,那么其postProcessBeforeInitialization()方法将被调用,Spring 框架会遍历得到容器中所有的 BeanPostProcessor ,挨个执行】
  4. InitializingBean.afterPorpertiesSet 【初始化bean, springboot读取properties文件的过程,默认的application.properties 还有其他方式】
  5. BeanPostProcessor.postProcessAfterInitialization(Object bean, String beanName) 【如果有BeanPostProcessor和Bean关联,那么其postProcessAfterInitialization()方法将被调用】
  6. SmartInitializingSingleton.afterSingletonsInstantiated
  7. martLifecycle.start
  8. 运行Bean
  9. SmartLifecycle.stop(Runnable callback)
  10. DisposableBean.destroy()【销毁】

2. bean生命周期内的部分实现

2.1. 动态注入bean的思路

  1. BeanFactory是 Spring 管理 bean 的对象
    1. 具体是:DefaultListableBeanFactory,这个类中有注入Bean的方法:registerBeanDefinition,在调用这个方法的时候,需要BeanDefinition参数
    2. BeanDefinition的参数是通过BeanDefinitionBuilder来进行构建。
  2. 所以我们动态注入bean的时候,只需要通过ApplicationContext对象即获取到上BeanFactory

2.2. 实现动态注入的代码

1
2
3
4
5
6
7
8
9
10
11
12
13
14
15
16
17
18
19
20
21
22
23
24
25
26
27
28
29
//测试的Service层的一个类
public class TestService {
private String name;
public String getName() {
return name;
}
public void setName(String name) {
this.name = name;
}
public void print(){
System.out.println("动态载入bean,name="+name);
}
}
//获取context.
ApplicationContext ctx = (ApplicationContext) SpringApplication.run(App.class, args);

//获取BeanFactory
DefaultListableBeanFactory defaultListableBeanFactory = (DefaultListableBeanFactory) ctx.getAutowireCapableBeanFactory();

//创建bean信息.
BeanDefinitionBuilder beanDefinitionBuilder = BeanDefinitionBuilder.genericBeanDefinition(TestService.class);
//为创建其添加属性
beanDefinitionBuilder.addPropertyValue("name","张三");
//动态注册bean.
defaultListableBeanFactory.registerBeanDefinition("testService", beanDefinitionBuilder.getBeanDefinition());
//获取动态注册的bean.
TestService testService =ctx.getBean(TestService.class);
//打印出爱我们新建的类的属性
testService.print();

2.3. 多次注入同一个bean的情况

  1. 如果同时注入到同一个bean中,如果beanName不同的话,那么就会产生两个Bean,如果beanName一直的话,后面注入的会覆盖前面的。
1
2
3
4
5
6
7
8
9
10
11
12
//创建第一个Bean
beanDefinitionBuilder = BeanDefinitionBuilder.genericBeanDefinition(TestService.class);
defaultListableBeanFactory.registerBeanDefinition("testService", beanDefinitionBuilder.getBeanDefinition());

//创建第二个bean
beanDefinitionBuilder = BeanDefinitionBuilder.genericBeanDefinition(TestService.class);
defaultListableBeanFactory.registerBeanDefinition("testService1", beanDefinitionBuilder.getBeanDefinition());

//正常的话,第二段的代码会出现Exception
//主要原因是,不能确定获取哪一个bean
//解决方案,将对应行代码修改成如下代码。
TestService testService =ctx.getBean("testService");

2.4. 设置Bean的Aware

  1. InitializingBean.afterPorpertiesSetBeanPostProcessor对bean的加工处理基本上在一块出现。
  2. 设置Aware方法顺序:
    1. BeanNameAware
    2. BeanClassLoaderAware
    3. BeanFactoryAware
  3. ApplicationContextAwareProcessor也会设置Aware:
    1. EnvironmentAware
    2. EmbeddedValueResolverAware
    3. ResourceLoaderAware
    4. ApplicationEventPublisherAware
    5. MessageSourceAware
    6. ApplicationContextAware
1
2
3
4
5
6
7
8
9
10
11
12
13
14
15
16
17
18
19
20
21
22
23
24
25
26
27
28
29
30
31
32
33
34
35
36
37
38
protected Object initializeBean(final String beanName, final Object bean, RootBeanDefinition mbd) {

// 设置Aware
if (System.getSecurityManager() != null) {
AccessController.doPrivileged(new PrivilegedAction<Object>() {
@Override
public Object run() {
invokeAwareMethods(beanName, bean);
return null;
}
}, getAccessControlContext());
}
else {
invokeAwareMethods(beanName, bean);
}

//BeanPostProcessor的postProcessBeforeInitialization
Object wrappedBean = bean;
if (mbd == null || !mbd.isSynthetic()) {
wrappedBean = applyBeanPostProcessorsBeforeInitialization(wrappedBean, beanName);
}

try {
//调用init方法,其判断是否是InitializingBean的实例,然后调用afterPropertiesSet
invokeInitMethods(beanName, wrappedBean, mbd);
}
catch (Throwable ex) {
throw new BeanCreationException(
(mbd != null ? mbd.getResourceDescription() : null),
beanName, "Invocation of init method failed", ex);
}

//BeanPostProcessor的postProcessAfterInitialization
if (mbd == null || !mbd.isSynthetic()) {
wrappedBean = applyBeanPostProcessorsAfterInitialization(wrappedBean, beanName);
}
return wrappedBean;
}

2.4.1. SmartInitializingSingleton.afterSingletonsInstantiated的调用位置

1
2
3
4
5
6
7
8
9
10
11
12
13
14
15
16
17
18
19
20
21
22
23
24
25
26
27
28
29
30
31
32
33
34
35
@Override
public void preInstantiateSingletons() throws BeansException {
if (this.logger.isDebugEnabled()) {
this.logger.debug("Pre-instantiating singletons in " + this);
}
// Iterate over a copy to allow for init methods which in turn register new bean definitions.
// While this may not be part of the regular factory bootstrap, it does otherwise work fine.
List<String> beanNames = new ArrayList<String>(this.beanDefinitionNames);

// Trigger initialization of all non-lazy singleton beans...
// 触发实例化所有的非懒加载的单例
for (String beanName : beanNames) {
...
}

// Trigger post-initialization callback for all applicable beans...
// 触发应用bean的post-initialization回调,也就是afterSingletonsInstantiated方法
for (String beanName : beanNames) {
Object singletonInstance = getSingleton(beanName);
if (singletonInstance instanceof SmartInitializingSingleton) {
final SmartInitializingSingleton smartSingleton = (SmartInitializingSingleton) singletonInstance;
if (System.getSecurityManager() != null) {
AccessController.doPrivileged(new PrivilegedAction<Object>() {
@Override
public Object run() {
smartSingleton.afterSingletonsInstantiated();
return null;
}
}, getAccessControlContext());
}else {
smartSingleton.afterSingletonsInstantiated();
}
}
}
}

2.4.2. SmartLifecycle.start

  1. 在ApplicationContext结束刷新finishRefresh时,getLifecycleProcessor().onRefresh();
  2. 判断bean是否为SmartLifecycle并且autoStartup。
  3. 位于:DefaultLifecycleProcessor.onRefresh

2.4.3. stop方法

  1. 在Application.close的时候,调用getLifecycleProcessor().stop()方法仍然在DefaultLifecycleProcessor内部

2.4.4. DisposableBean.destroy方法

  1. doCreateBean方法中会判断bean是否有销毁相关操作,实现了DisposableBean方法或定义了销毁方法。
  2. AbstractAutowireCapableBeanFactory.doCreateBean(final String beanName, final RootBeanDefinition mbd, final Object[] args)

Bean声明周期演示以及运行结果

1
2
3
4
5
6
7
8
9
10
11
12
13
14
15
16
17
18
19
20
21
22
23
24
25
26
27
28
29
30
31
32
33
34
35
36
37
38
39
40
41
42
43
44
45
46
47
48
49
50
51
52
53
54
55
56
57
58
59
60
61
62
63
64
65
66
67
68
69
70
71
72
public class HelloWorld implements SmartInitializingSingleton,SmartLifecycle,InitializingBean,
DisposableBean,MyInterface,BeanNameAware,ApplicationContextAware
{

private final Log logger = LogFactory.getLog(getClass());
private boolean isRunning;


public HelloWorld() {
System.out.println("实例化");
}

public void sayHello(){
System.out.println("hello World");
}

public void afterSingletonsInstantiated() {
System.out.println("SmartInitializingSingleton afterSingletonsInstantiated");
}

public void start() {
isRunning = true;
System.out.println("LifeCycle start");
}

public void stop() {
System.out.println("LifeCycle stop");
}

public boolean isRunning() {
return isRunning;
}

public boolean isAutoStartup() {
return true;
}

public void stop(Runnable callback) {
System.out.println("LifeScycle stop");
callback.run();
}

public int getPhase() {
return 0;
}

public void afterPropertiesSet() throws Exception {
System.out.println("afterproperties set");
}

public void destroy() throws Exception {
System.out.println("destroy");
}

public void my(String str) {
System.out.println(str);
}

public void setBeanName(String name) {
System.out.println("set bean Name aware");
}

public void setApplicationContext(ApplicationContext applicationContext) throws BeansException {
System.out.println("set Application Aware");
}
}


//MyInterface接口
public interface MyInterface {
void my(String str);
}
1
2
3
4
5
6
7
8
9
10
11
//app.xml
<?xml version="1.0" encoding="UTF-8"?>
<beans xmlns="http://www.springframework.org/schema/beans"
xmlns:xsi="http://www.w3.org/2001/XMLSchema-instance"
xsi:schemaLocation="http://www.springframework.org/schema/beans http://www.springframework.org/schema/beans/spring-beans.xsd">

<bean id="porcessor" class="me.aihe.MyBeanPostProcessor" />
<bean id="hello" class="me.aihe.HelloWorld">

</bean>
</beans>
1
2
3
4
5
6
7
8
9
//SpringApp
public class SpringApp {
public static void main(String[] args) {
ClassPathXmlApplicationContext applicationContext = new ClassPathXmlApplicationContext("app.xml");
HelloWorld hello = (HelloWorld) applicationContext.getBean("hello");
hello.sayHello();
applicationContext.close();
}
}

2.5. 动态删除Bean

1
2
 //删除bean.  
defaultListableBeanFactory.removeBeanDefinition("testService");

3. 参考

  1. Spring Boot轻松理解动态注入,删除bean
  2. 【SpringBoot】SpringBoot的基础,全面理解bean的生命周期

40-Spring Bean
https://spricoder.github.io/2022/04/13/Spring-Boot/40-Spring-Bean/
作者
SpriCoder
发布于
2022年4月13日
许可协议